Table of Contents
ToggleDisable Auto-Updates
Windows 11 is the latest operating system from Microsoft, and it brings a range of exciting new features and improvements. One of the key features of Windows 11 is its automatic update system, which ensures that your computer always has the latest security patches, bug fixes, and performance improvements. However, some users may prefer to disable auto-updates for various reasons such as avoiding potential issues, control over updates and their timing, and bandwidth and data usage concerns. In this blog post, we will discuss how to disable auto-updates on Windows 11 using four different methods: through the Update services, Settings app, Registry Editor, and Group Policy Editor. We will also cover alternative options to auto-updates, such as manual updates and scheduling updates. By the end of this post, you will have a clear understanding of how to disable auto-updates on Windows 11 and manage updates to suit your needs.
Disable Automatic Updates in Windows 11 Using Update Services
To disable automatic updates in Windows 11 using update services, follow these steps:
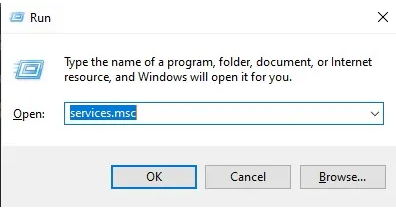
Press the Windows key + R on your keyboard to open the Run dialog box.
Type “services.msc” (without quotes) in the Run box and press Enter to open the Services window.
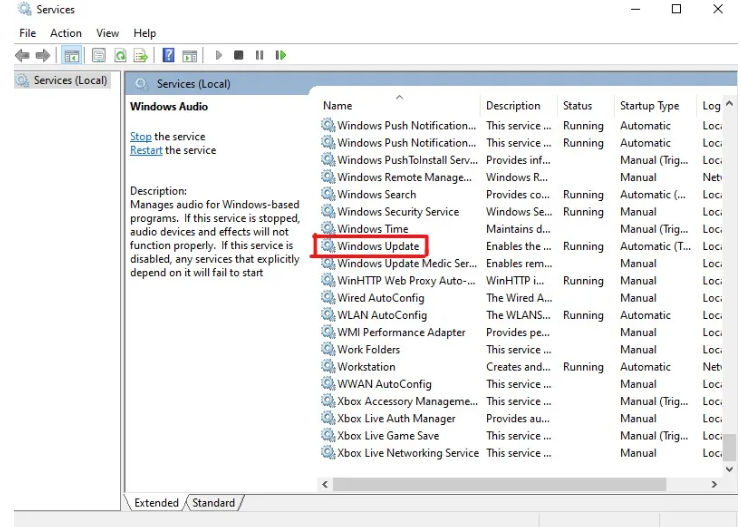
Scroll down and locate the “Windows Update” service in the list.
Right-click on the “Windows Update” service and select “Properties” from the context menu.
In the Properties window, click on the “Startup type” dropdown menu and select “Disabled” from the list of options.
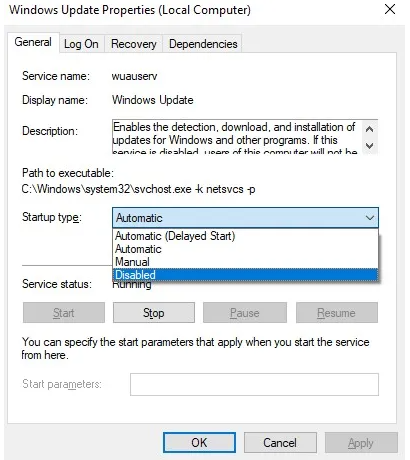
Click on the “Stop” button to stop the Windows Update service.
Click on the “Apply” button to save your changes.
Restart your computer to apply the changes.
After disabling the Windows Update service, Windows 11 will no longer automatically download and install updates. However, keep in mind that this can leave your computer vulnerable to security threats and may cause issues with compatibility and stability in the long run. It’s generally recommended to keep automatic updates enabled and use other methods, such as setting up a schedule, to control when updates are installed.
Disable Auto-Updates on Windows 11 Using the Settings app
The Settings app is a built-in tool that lets you manage various aspects of your Windows 11 system, including updates. Follow the steps below to disable auto-updates using the Settings app:
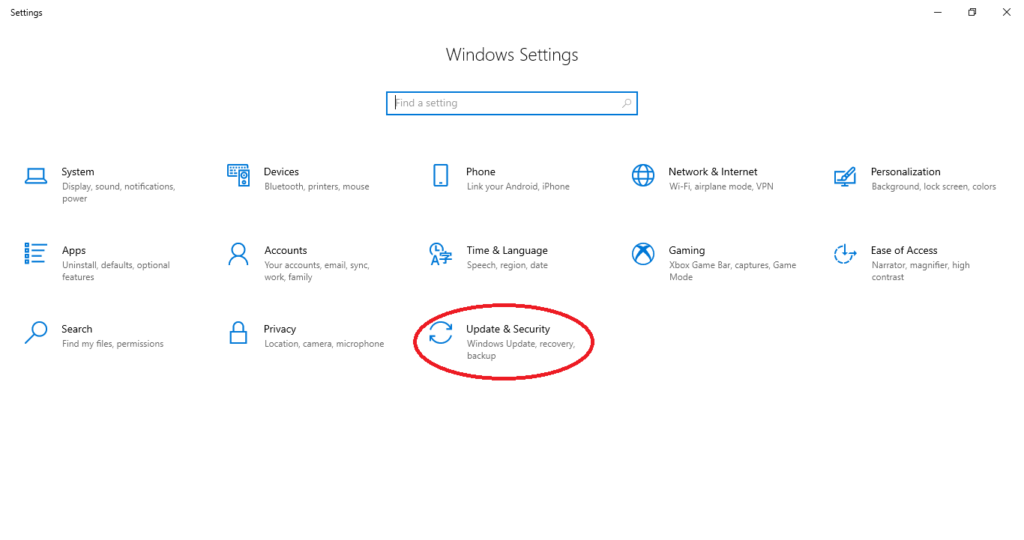
Open the Settings app by clicking on the Start button and selecting the gear icon, or by pressing the Windows key + I on your keyboard.
Click on “Update and Security”.
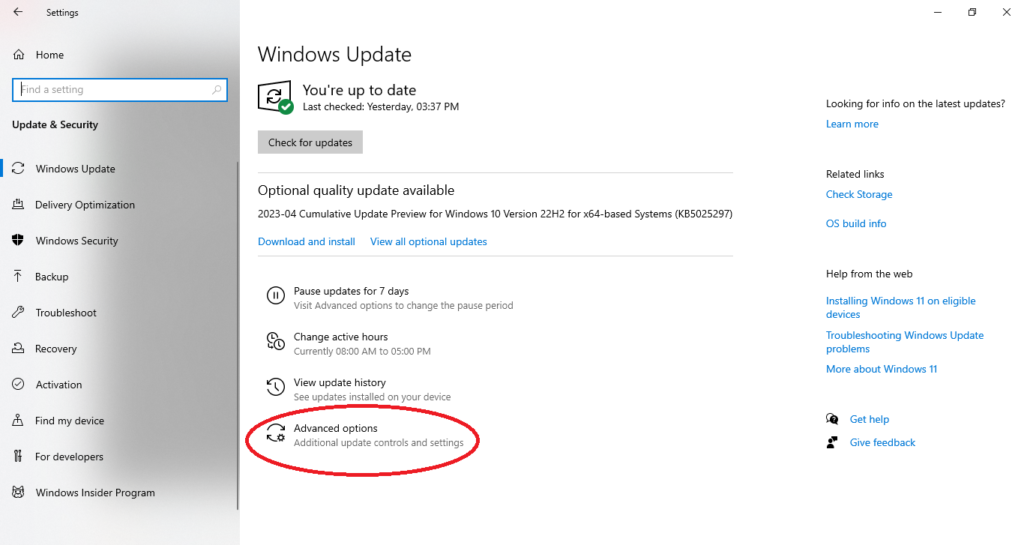
Click on “Windows Update” from the list of options on the left-hand side.
Click on “Advanced options” towards the bottom of the screen.
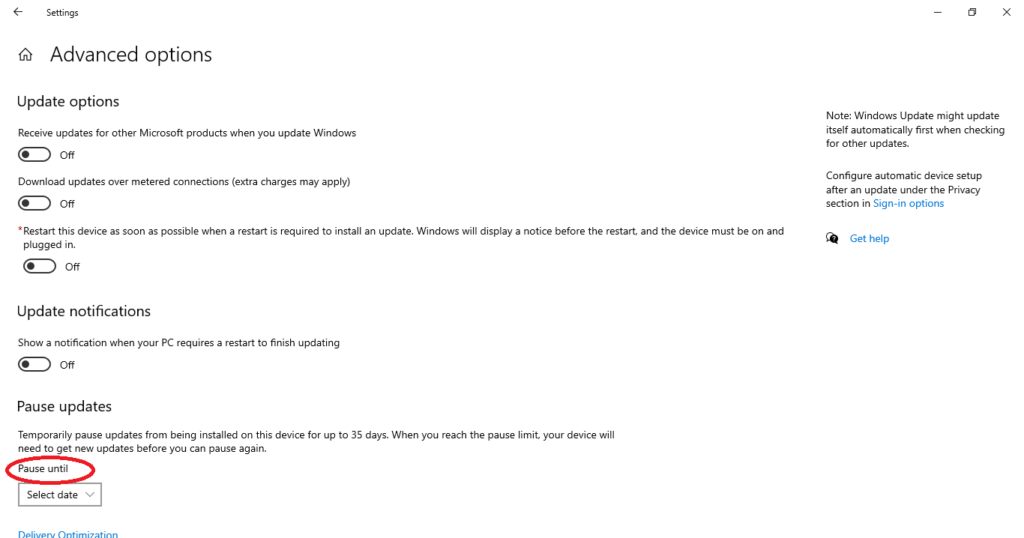
Under the “Pause updates” section, toggle the switch to turn on the “Pause until” option.
Use the dropdown menu to select a date that is far enough in the future to keep updates paused for a while.
That’s it! Your computer will no longer automatically download or install updates. However, keep in mind that this method only disables updates temporarily, and you will need to repeat the process to pause updates again in the future. If you want to disable updates permanently, consider using one of the other methods discussed later in this post.
Disable Auto-Updates on Windows 11 Using the Registry Editor
Follow the steps below to disable auto-updates on Windows 11 using the Registry Editor:
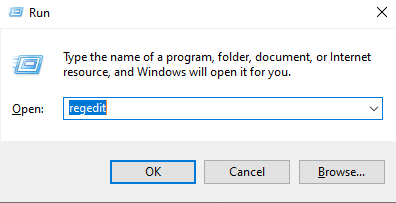
Press the Windows key + R on your keyboard to open the Run dialog box.
Type “regedit” (without quotes) and press Enter to open the Registry Editor.
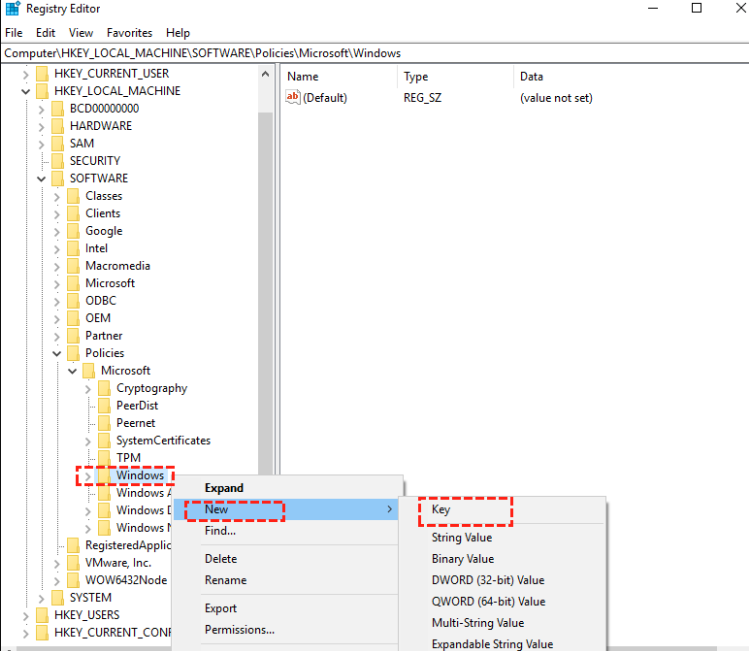
Navigate to the following path using the left-hand sidebar:
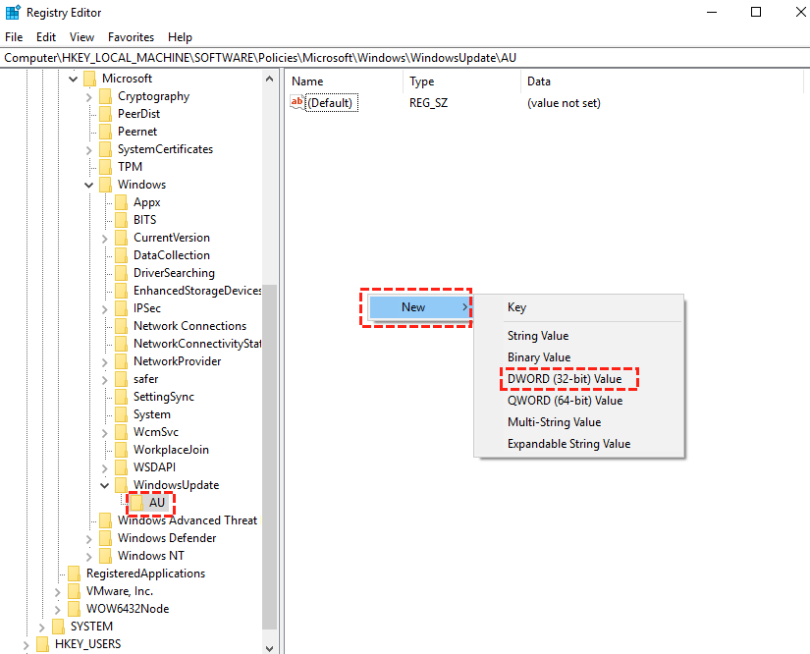
HKEY_LOCAL_MACHINE\SOFTWARE\Policies\Microsoft\Windows\WindowsUpdate\AU
If the “WindowsUpdate” and/or “AU” folders do not exist, you will need to create them. To do this, right-click on the “Windows” folder and select “New” > “Key”. Name the new folder “WindowsUpdate” and press Enter. Right-click on the new “WindowsUpdate” folder and select “New” > “Key”. Name the second new folder “AU” and press Enter.
Right-click on the blank area, choose “New” > “DWORD (32-bit) Value”.
Type “NoAutoUpdate” in the Value name box, and change the value date from 0 to 1, then click “OK”.
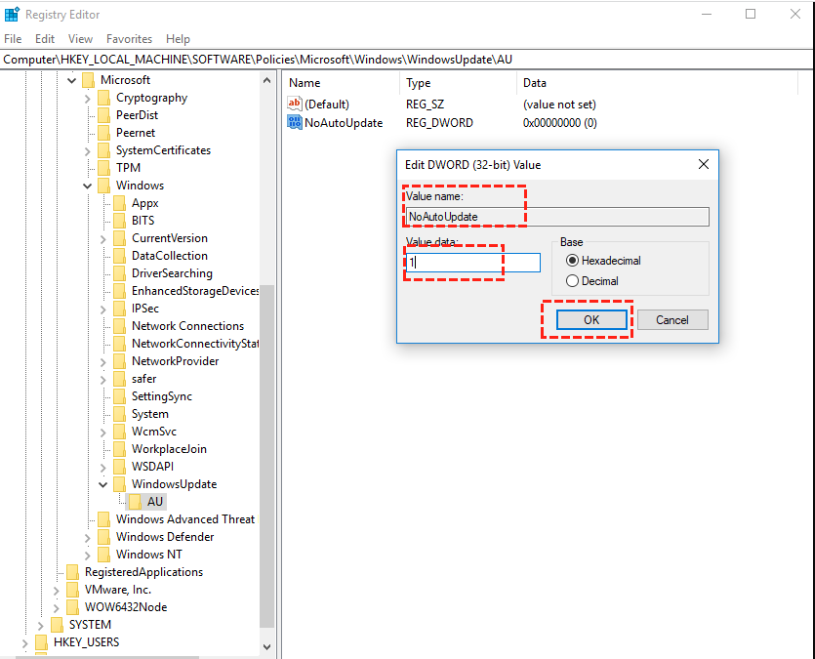
Close the Registry Editor and restart your computer for the changes to take effect.
Disable Auto-Updates on Windows 11 Using Group Policy Editor
Note: Group Policy Editor is only available in Windows 11 Pro, Education, and Enterprise editions. If you are using Windows 11 Home, this method will not be available to you.
Follow the steps below to disable auto-updates on Windows 11 using the Group Policy Editor:
- Press the Windows key + R on your keyboard to open the Run dialog box.
- Type “gpedit.msc” (without quotes) and press Enter to open the Group Policy Editor.
- Navigate to the following path using the left-hand sidebar:
- Computer Configuration\Administrative Templates\Windows Components\Windows Update
- Double-click on “Configure Automatic Updates” to open the policy settings.
- Select the “Enabled” option.
- Use the dropdown menu next to “Configure automatic updating” to select one of the following options:
- 2 = Notify for download and notify for install.
- 3 = Auto download and notify for install.
- 4 = Auto download and schedule the install.
- 5 = Allow local admin to choose setting.
- Click “Apply” and then “OK” to save your changes.
Close the Group Policy Editor and restart your computer for the changes to take effect.
That’s it! Windows 11 will no longer automatically download or install updates based on the policy you set in the Group Policy Editor. If you want to re-enable automatic updates in the future, simply return to the “Configure Automatic Updates” policy and change the setting back to “Not configured” or one of the other options listed above.
How to manually update Windows 11
To manually update Windows 11, follow the steps below:
- Click on the Start button and select the gear icon to open the Settings app.
- Click on “Windows Update” from the list of options on the left-hand side.
- Click on “Check for updates” towards the top of the screen.
- If there are any available updates, click on the “Download and install” button.
- Wait for the updates to download and install. This may take some time depending on the size of the update and your internet connection speed.
- Once the updates have finished installing, you may need to restart your computer to complete the installation process.
Alternatively, you can also download and install updates from the Microsoft Update Catalogue website:
- Go to the Microsoft Update catalogue website in your web browser.
- Search for the update you want to download using the search bar at the top of the page.
- Click on the “Download” button next to the update you want to download.
- Save the downloaded update file to a location on your computer.
- Double-click on the downloaded update file to begin the installation process.
- Follow the on-screen instructions to complete the installation process.
That’s it! Manually updating Windows 11 can be useful if you want to install a specific update or if you have disabled automatic updates and want to make sure your system is up to date.
How to set up a schedule for updates
To set up a schedule for updates on Windows 11, you can use the built-in Windows Update settings in the Settings app. Here’s how:
- Open the Settings app by clicking on the Start menu and selecting the gear icon, or by pressing the Windows key + I on your keyboard.
- Click on “Windows Update” from the list of options on the left-hand side.
- Click on the “Advanced options” link towards the bottom of the screen.
- Scroll down to the “Pause updates” section and click on the dropdown menu.
- Select the number of days you want to pause updates for. This will prevent Windows from automatically downloading and installing updates during the selected time period.
- If you want to set up a specific schedule for updates, scroll down to the “Scheduled install day” section.
- Click on the dropdown menu and select the day of the week you want updates to be installed on.
- Use the “Scheduled install time” dropdown menu to select the time of day you want updates to be installed.
- Once you have selected your preferred schedule, click on the “Apply” button to save your changes.
That’s it! Windows 11 will now automatically download and install updates according to the schedule you have set up. Keep in mind that updates are important for the security and stability of your computer, so it’s generally a good idea to keep them up to date.
Tips for optimizing updates
Here are a few additional tips for optimizing updates on Windows 11:
Use a fast and reliable internet connection
Updates can be large in size, so having a fast and stable internet connection can help speed up the download and installation process.
Keep your computer plugged in
If you’re installing a large update, it’s a good idea to keep your laptop or tablet plugged in to ensure that the battery doesn’t run out during the installation process.
Avoid interrupting the update process
Interrupting an update (such as by turning off your computer) can cause issues and may require you to start the update process over from the beginning.
Create a backup
Before installing major updates, it’s a good idea to create a backup of your important files and data. This can help prevent data loss in case something goes wrong during the update process.
Remove unnecessary files and programs
Before installing updates, consider removing any unnecessary files, programs, or apps from your computer. This can help free up space and may make the update process faster and smoother.
Keep your drivers up to date
Updating your computer’s drivers can help ensure that your hardware is working properly and may help prevent issues with updates.
By following these tips, you can help ensure that updates on your Windows 11 computer go smoothly and without issue.
Conclusion
In conclusion, updating your Windows 11 computer is important for keeping your system secure and running smoothly. While automatic updates are enabled by default, you can also manually check for and install updates, or set up a schedule for updates to be installed. It’s important to keep your computer connected to a reliable internet source and avoid interrupting the update process. By following these tips and best practices, you can optimize the update process and ensure that your computer is running the latest software and security updates.